Black Forest Cheesecake Cupcakes: A Symphony of Flavor in Every Bite
Imagine the lusciousness of a classic Black Forest cake – the rich chocolate, the sweet-tart cherries, and the ethereal whipped cream – but now, transform that beloved profile into a convenient, individual dessert. Welcome to the world of
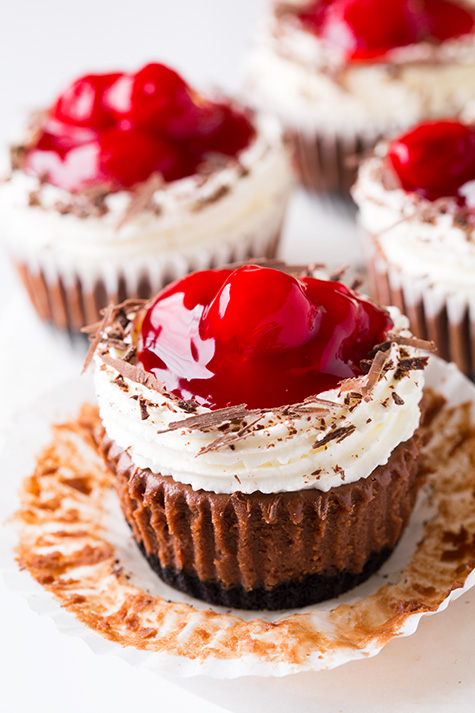
Black Forest Cheesecake Cupcakes, a culinary masterpiece that combines the best of a chocolate-cherry cake with the creamy decadence of a cheesecake, all nestled atop a crunchy Oreo crust. These aren't just cupcakes; they're miniature works of art, designed to seduce your palate with harmonious contrasts of texture, aroma, and taste.
Whether you're a devoted fan of chocolate-covered cherries or simply seeking a show-stopping dessert that's surprisingly easy to master, these individual cheesecakes promise an unforgettable experience. From the satisfying crunch of the cookie base to the velvety chocolate cheesecake filling, and crowned with a dollop of fresh whipped cream and vibrant cherry topping, every component works in unison to create a truly irresistible treat.
Crafting the Perfect Black Forest Cheesecake Cupcakes: A Culinary Journey
The magic of these
homemade Black Forest Cheesecake Cupcakes lies in their distinct layers, each contributing its unique character to the overall experience. Let's delve into the creation process, breaking down each delicious stage.
The Foundation: Crunchy Oreo Crust
The journey begins with a robust and flavorful base. Forget plain graham crackers; for Black Forest Cheesecake Cupcakes, an Oreo crust is the undisputed champion. It provides a deeper chocolate flavor and a delightful crunch that perfectly complements the creamy filling.
*
Ingredients: 12 Oreo cookies and 1 ½ tablespoons of melted salted butter.
*
Preparation:
1. Preheat your oven to a moderate 325°F (160°C).
2. Crush the Oreos finely. A food processor makes this task incredibly quick and efficient, but a sturdy zip-top bag and a rolling pin work just as well for a therapeutic crunching session.
3. In a mixing bowl, combine the crushed Oreos with the melted butter, stirring with a fork until the crumbs are thoroughly moistened and resemble wet sand.
4. Line a 12-cup muffin tin with paper liners. Distribute the Oreo mixture evenly among the liners, adding about a heaping tablespoon to each.
5. Using the back of a spoon or a small, flat-bottomed glass, firmly press the crumbs into a compact, even layer at the bottom of each liner.
6. Bake for just 5 minutes. This quick bake helps to set the crust, preventing it from becoming soggy later. Remove from the oven and let them cool completely while you prepare the filling.
The Heart: Velvety Chocolate Cheesecake Filling
This is where the cheesecake truly comes alive, delivering a rich, smooth, and intensely chocolatey experience. The secret lies in using quality ingredients and a gentle hand.
*
Ingredients: 4.5 oz (¾ cup) semi-sweet chocolate chips or chopped chocolate (melted and slightly cooled), ⅔ cup granulated sugar, 2 tablespoons unsweetened cocoa powder, a pinch of salt, 12 oz. cream cheese (1 ½ 8 oz. packages, very well softened), 2 large eggs, 1 teaspoon vanilla extract, ¼ cup heavy cream, and ¼ cup sour cream.
*
Preparation:
1. In a clean mixing bowl, whisk together the granulated sugar, cocoa powder, and salt until there are no lumps of cocoa remaining. This ensures a smooth chocolate distribution throughout the cheesecake.
2. In a separate, larger mixing bowl, add the softened cream cheese. Pour the sugar-cocoa mixture over the cream cheese. Using an electric hand mixer on low speed, whip the mixture just until it's smooth and creamy. Be careful not to overmix at this stage.
3. Add the eggs one at a time, mixing just until combined after each addition. Incorporate the vanilla extract with the second egg. Overmixing eggs can introduce too much air, leading to cracks in your cheesecake.
4. Gently pour in the slightly cooled melted chocolate and mix just until it's fully incorporated.
5. Finally, add the heavy cream and sour cream, mixing on low speed just until the batter is homogenous. The sour cream adds a crucial tang and helps achieve that signature velvety texture.
6. A critical step often overlooked: Forcefully tap the mixing bowl against your countertop about 30 times. This helps to release any trapped air bubbles, contributing to a denser, smoother cheesecake texture.
7. Divide the rich chocolate cheesecake batter evenly among the cooled Oreo crusts in the muffin tin, adding about a slightly heaping ¼ cup to each.
*
Baking & Chilling:
1. Bake in the preheated 325°F (160°C) oven for 17-20 minutes, or until the centers only jiggle slightly when gently nudged. They will continue to set as they cool.
2. Remove from the oven and allow them to cool at room temperature for 1 hour.
3. Once cooled, cover the muffin tin tightly with plastic wrap and refrigerate for a minimum of 2 hours (or preferably overnight). This chilling period is crucial for the cheesecake to firm up and develop its proper texture.
The Crown: Sweet-Tart Cherry Topping & Cloud-Like Whipped Cream
The finishing touches bring all the Black Forest elements together, creating a visually stunning and incredibly delicious dessert.
*
Ingredients: 1 ¼ cups heavy cream, 2 ½ tablespoons granulated sugar, store-bought (canned) or homemade cherry pie filling, and finely chopped or shaved chocolate for garnish (optional).
*
Preparation:
1. In a chilled mixing bowl, using an electric hand mixer, whip the 1 ¼ cups of heavy cream until soft peaks begin to form.
2. Gradually add the 2 ½ tablespoons of granulated sugar and continue whipping until stiff peaks form. Be careful not to over-whip, or you'll end up with butter!
3. Once the cheesecake cupcakes are thoroughly chilled, gently remove them from the muffin tin.
4. Pipe or spread a generous layer of whipped cream over the top of each cupcake. If spreading, you can create a small well in the center. If piping, a decorative rim around the edge looks beautiful.
5. Spoon a heaping tablespoon (about 2 tablespoons) of cherry pie filling into the center of each cupcake, nestled into the whipped cream.
6. For an extra touch of elegance and flavor, sprinkle with finely chopped or shaved chocolate.
7. Store the finished Black Forest Cheesecake Cupcakes in an airtight container in the refrigerator. While they taste fantastic immediately, letting them rest at room temperature for about 10 minutes before serving can enhance their texture. For optimal freshness, it's best to add the whipped cream and cherry topping within 2 hours of serving.
Essential Tips for Black Forest Cheesecake Cupcake Perfection
Achieving baking excellence, especially with cheesecakes, often comes down to a few key principles. Here are some insights to ensure your Black Forest Cheesecake Cupcakes turn out flawlessly every time:
*
Ingredient Quality Matters: Opt for full-fat cream cheese for the creamiest texture and richness. High-quality semi-sweet chocolate will also significantly impact the depth of flavor.
*
Room Temperature Reigns: Ensure your cream cheese and eggs are at room temperature. Softened cream cheese blends smoothly without lumps, and room-temperature eggs incorporate more easily, resulting in a homogenous batter.
*
The Gentle Touch: When mixing the cheesecake batter, particularly after adding the eggs, resist the urge to overmix. Overmixing introduces excess air, which can cause the cheesecake to puff up significantly during baking and then crack as it cools. Whip just until ingredients are combined.
*
Patience is a Virtue (Chilling!): Do not skip or shorten the chilling steps. This is absolutely critical for the cheesecake to set properly, ensuring a firm yet creamy texture that holds its shape when topped and served.
*
Customization & Creativity: While the classic cherry pie filling is fantastic, consider making a quick homemade cherry sauce from fresh or frozen cherries for a gourmet touch. Experiment with dark chocolate for a richer, more intense chocolate flavor in the cheesecake. Garnish with fresh cherries alongside the chocolate shavings for extra visual appeal and a burst of fresh fruit.
Serving, Storing, and Savoring Your Black Forest Cheesecake Cupcakes
These Black Forest Cheesecake Cupcakes are not just desserts; they are an experience. They are perfect for special occasions, dinner parties, or simply as an indulgent treat to brighten your day.
*
Serving Suggestions: For the best texture and flavor, allow your cupcakes to sit at room temperature for about 10 minutes before serving. This slight warming enhances the creaminess of the cheesecake and the aroma of the chocolate. Their individual portion size makes them incredibly convenient for serving, eliminating the need for slicing and ensuring a beautiful presentation for every guest.
*
Storage: Store any leftover cupcakes in an airtight container in the refrigerator for up to 3-4 days. As mentioned, for peak freshness, it’s best to add the whipped cream and cherry topping shortly before serving. If you plan to make them ahead, prepare and bake the cheesecake bases, chill them, and then add the toppings on the day of your event.
Indulge in a Decadent Treat
With their stunning presentation and an exquisite balance of flavors and textures, these Black Forest Cheesecake Cupcakes are sure to impress even the most discerning dessert connoisseurs. The intense chocolate, the bright burst of cherry, the smooth creaminess of the cheesecake, and the delightful crunch of the Oreo crust all come together in a symphony of taste that celebrates the beloved Black Forest tradition in a new, exciting format. Go ahead, gather your ingredients, and prepare to delight your senses with these utterly irresistible individual treats.